By Wm H Robinson, B&G Equipment Company
The B&G sprayer is the workhorse of professional pest control. Most service technicians use their sprayer every day for routine pest control service, or for special jobs that require precise application. The tip shut-off valve ensures customer safety, and the rugged stainless steel and brass construction ensures long service. However, the sprayer has moving parts, valves, and washers that require regular maintenance to keep them in top condition. Monthly care and cleaning of the sprayer will keep it trouble-free.
The ‘Six-Point Maintenance’ program will keep your B&G sprayer ready for any pest control job. This program covers the key components of the sprayer—from the nozzle to the tank—and takes about 15 minutes. Start with an empty tank, and the hose drained of liquid. It helps to work at a sink with good lighting. Start at the nozzle and work back to the pump tube, and finish by cleaning the tank.
Six-Point Maintenance
 Nozzle – The nozzle is made of high-grade brass and will survive being knocked around in the back of service trucks. However, with extended use the openings for the fan sprays and the pin-stream will gradually enlarge. This increase will change the angle of the spray, and the distribution pattern of the liquid in the fan may become uneven.
Note: The general appearance of the nozzle may not indicate that the openings have enlarged or are damaged. Replacing the nozzle every year is a reasonable schedule and will maintain an accurate spray pattern and flow rate.
- Hose – The hose needs replacement only when damaged. Check the connection points: hose to valve, and hose to tank. These are common sites for wear and leaks. A leak at the host-to-tank connection may require replacing the Teflon washer. Don’t over-tighten this fitting, the washer may be crushed and clog the hose.
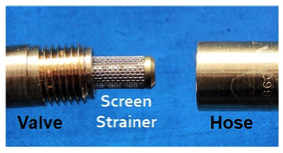 Filter/Strainer –The filter/strainer should be removed, cleaned, and replaced regularly. Regardless of the water source or insecticides used, small pieces of dirt and debris often get into the tank. The strainer keeps dirt from clogging the valve and blocking the spray.

The filter on the Next Generation valve is located at the hose and valve junction. It is a flat screen that filters the liquid before it enters the valve, and it is held in place by an O-ring. The mesh on this filter is the same as for the filter in the standard Extenda- ban valve and serves the same purpose—remove dirt from the incoming liquid. Remove it and clean with a nylon brush.
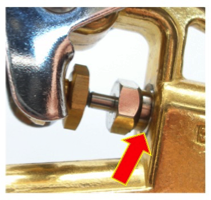 Valve – The Extenda-Ban valve is designed for long service without leaking. A leak in the gaskets may result in a small amount of liquid on the handle, or at the end of the valve. Small leaks can be corrected by slight tightening (1/4 turn) of the packing nut; use a 3/8 wrench.
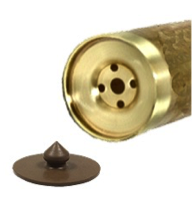 Check Valve —The check valve at the base of the pump cylinder admits air into the tank as the pump handle is depressed. It can become worn and deposits around its edge (on the pump cylinder) can cause it to leak. Periodically replacing the check valve (PV-266) will keep proper pressure in the tank. Clean the bottom of the pump cylinder to remove deposits that build up around the edge of the check valve.
Cleaning the Tank
Pesticide residues can form on the inside of the tank, especially when the tank is not emptied every day. Cleaning inside the stainless steel tank is an important part of a care and maintenance program, but should be performed carefully and with the correct cleaning fluids.
Do not use bleach as a cleaning agent. It is not effective in removing pesticide residue, and it can create small holes in the stainless steel tank. Cleaning should be done with a warm, detergent solution and with a plastic brush to remove residue from the tank bottom and sides. Do not use ammonia-based cleaning materials because this chemical will damage the brass parts. The siphon tube extends along the side and close to the bottom of the tank; be careful not to hit (and possibly bend) the siphon tube when using a brush to clean inside the tank. The hose can be cleaned with detergent solution by pressurizing the tank and spraying into a sink for several minutes. Rinse the tank with clear water several times and flush the hose with clear water. If the sprayer is not going to be used for an extended period, remove the pump unit and store the tank upside down.